Creating and managing Microsoft Teams meetings within Blackboard offers many of the same functionalities as Teams meetings created from your Teams app, browser, or calendar. However, there are a few important key differences that you should be aware of when creating and managing Teams meetings within Blackboard.
Teams meetings can be created from the Microsoft Education tool, available from the Content Market. For details on Teams integration and general Teams features, please refer to the related resources at the end of this article.
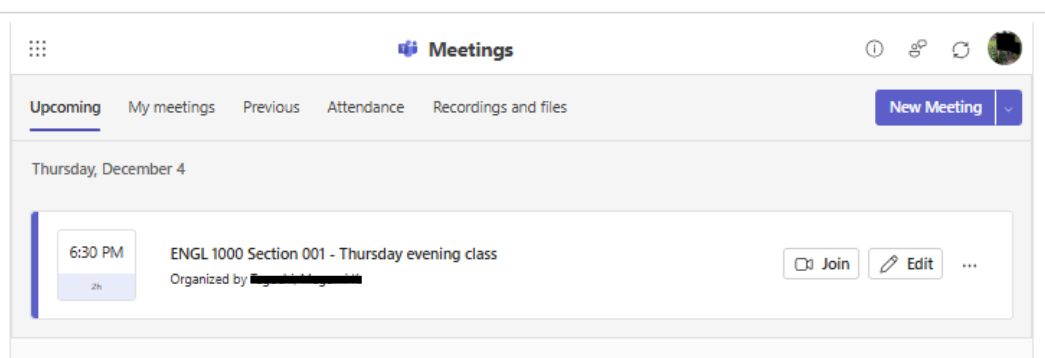
How do instructors and students create a Teams meeting?
-
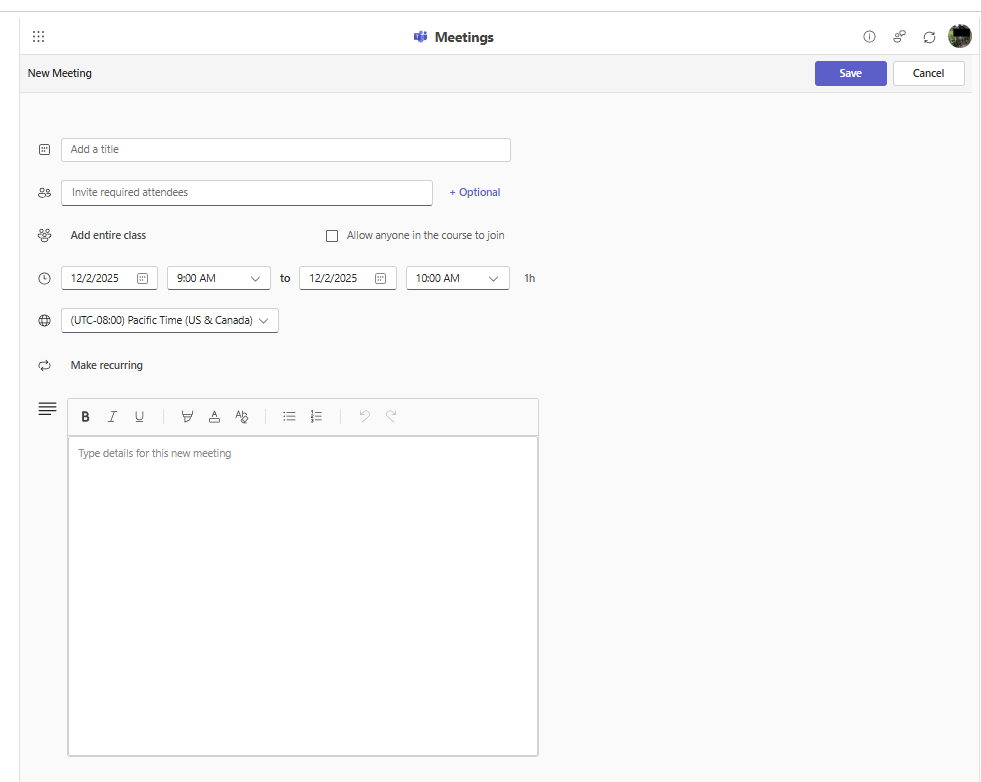
In Microsoft Education, select New Meeting and add a descriptive title including your course name and section. For example: “ENGL 1130-001 Wednesday evening class”
-
Invite attendees individually or click Add entire class. You can also invite other Douglas College users outside of the class by typing in their name.
-
Add a date and time for the meeting. Select Make recurring if applicable.
-
Add details to the meeting and click Save.
-
Attendees will be notified by email of the meeting.
Important:
-
Students will not know which course the meeting originated from, so it’s important to add those details in the meeting title.
-
If you select Allow anyone to join, students cannot access the meeting recording from the Recordings and files tab even if they join the meeting.
-
Students have the ability to create meetings with their instructors, classmates, and other users in Douglas College. Instructors and administrators are not able to view, edit, or delete these meetings.
What meeting options should I choose?
You can alter default meeting settings after creating the meeting. To change these settings, click Edit to the right of the meeting and select Meeting Options on the top right.

Key features:
-
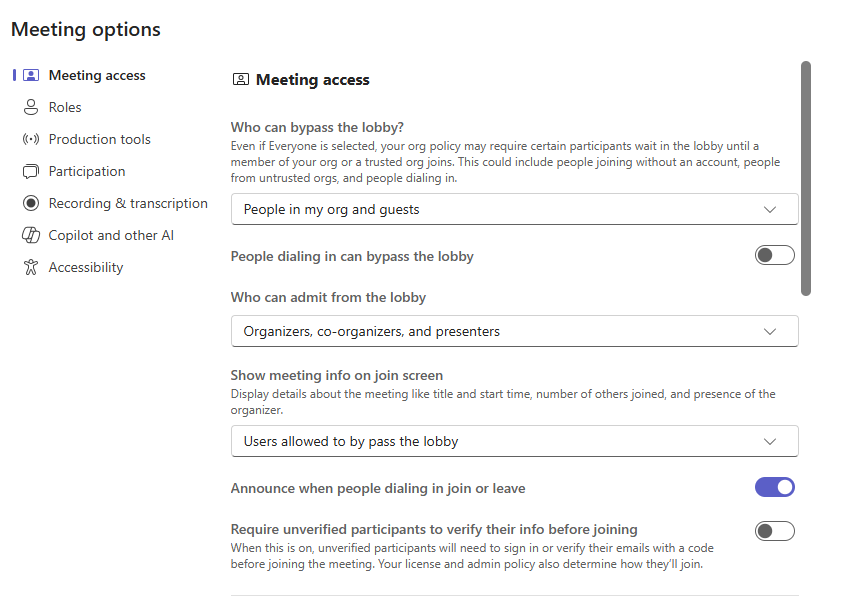
Meeting access:
-
Bypassing lobby: Decide who can bypass the lobby and admit participants.
-
Unverified participants: Toggle on “Require unverified participants to verify their info before joining” so that students must log in to Teams before joining the meeting.
-
-
Roles:
-
Co-organizers: Choose one or more participants to be co-organizers if applicable. Co-organizers cannot edit meetings, but can present content, manage breakout rooms, change participant roles, etc.
-
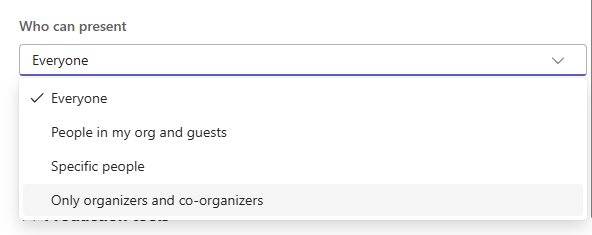
Presenting: By default, everyone in the meeting is a presenter. Presenters can share content, mute other participants, start/stop recordings, and remove members.
-
We recommend that you change the default of who can present to Only organizers and co-organizers.
-
Participation: By default, participants can use their mics, cameras and react during meetings. Meeting chat is on by default during and after the meeting. If you don’t want students to have the ability to chat after the meeting, change this to In-meeting only.
-
Recording & transcription: By default, recordings have to be turned on manually during the meeting. Toggle this option on to have meetings automatically recorded.
More information:
How can you join meetings?
There are three main ways to join Teams meetings:
-
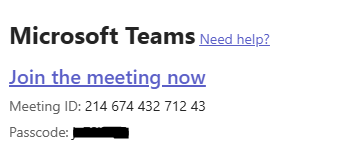
If you are invited to meetings, you will receive an email notification. Join the meeting by clicking the Join the meeting now link in the email.
-
You can join the meeting within Blackboard by selecting Microsoft Education in the Content Market on the Content page, selecting the Join icon to the right of the meeting you wish to join.
-
Meetings created in Blackboard will appear in your Microsoft 365 calendar. Select the meeting, then choose Join.
-
When joining meetings, it is best to use the Teams app. Instructors can only create breakout rooms in the Teams app.
-
Students should log in to the Teams app or the browser before joining meetings. Otherwise, the instructor will have to admit the student to the meeting as a guest.
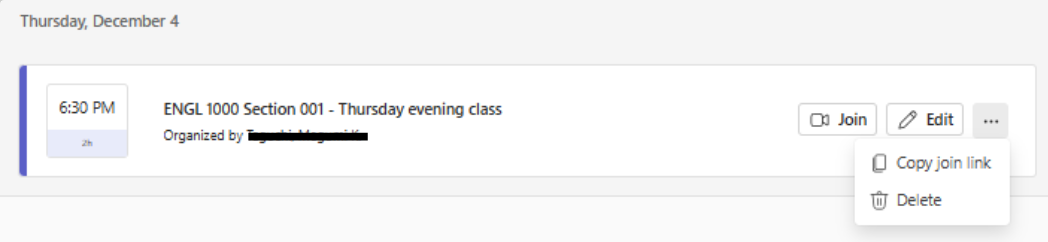
How do I invite external guests to my meeting?
-
In your meeting list, select the three dots to the right of the meeting name and choose Copy join link from the dropdown menu.
-
Send the link to the external guest.
-
If the guest is joining from a desktop device, they do not need to have the Teams app. If they join via their mobile, they will be prompted to get the Mobile app.
-
The guest can either sign in to Teams and use an existing account, or join without signing in and using a nickname.
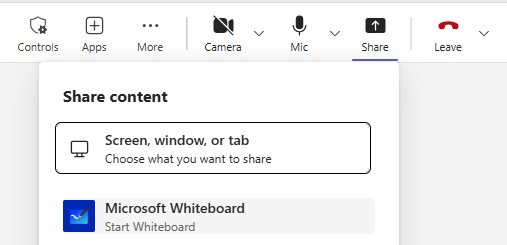
How can I use the Whiteboard in Teams meetings?
Method 1 (recommended when not recording):
Organizers, Co-organizers, and Presenters can use Whiteboards in Teams meetings via the Share tool and clicking on Microsoft Whiteboard. We recommend this method if you are not recording your Team meeting.
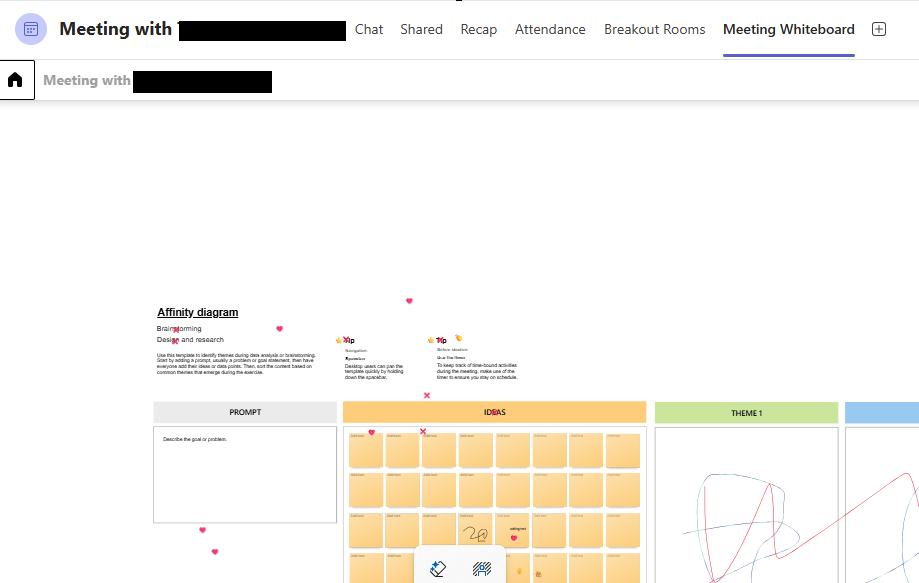
The Whiteboard can be accesed after the meeting via the Meeting Whiteboard tab in the meeting channel.
Method 2 (recommended when recording):
If you record using method 1, only audio will be recorded. However, if you wish to collaborate with students using a Whiteboard and wish to record, we recommend taking the following steps. As there are quite a few steps, it is advisable copy the whiteboard link (Steps 1-4) before students arrive.
-
In your meeting, select the Share tool and choose Microsoft Whiteboard. Choose a template or start with a blank Whiteboard and if your students will collaborate on the Whiteboard with you.
-
Select Open in browser in the top right corner.
-
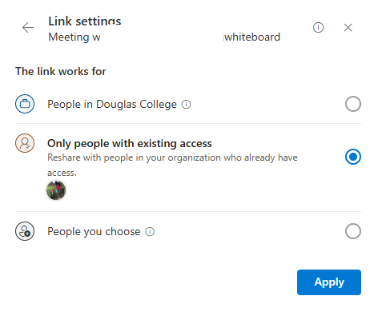
Share the Microsoft Whiteboard link: Click on Share > gear icon > select Only people with existing access > Apply.
-
Select Copy link and share the link in the chat.
-
Instruct students to enter the whiteboard via the link.
-
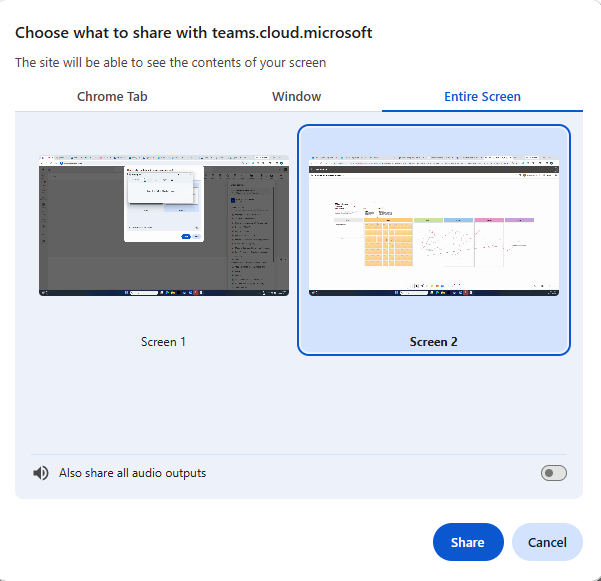
Select the Share tool again and select Screen, window, or tab. This step will allow you to record the Whiteboard.
-
Choose if you want to share the Whiteboard by sharing the entire screen, window, or tab. Select Share at the bottom of the pop-up. Students do not need to follow what you are showing on the screen as they will have direct acces to the whiteboard.
-
Select the three dots in the tools bar > Record and transcribe > Start recording.
-
The Whiteboard can be accesed after the meeting via the Meeting Whiteboard tab in the meeting channel.
This method works best with two screens with your whiteboard open in one screen, and your Teams desktop application open in another.
For more details on how to use a Whiteboard in a Teams meeting, check the link below.
More information:
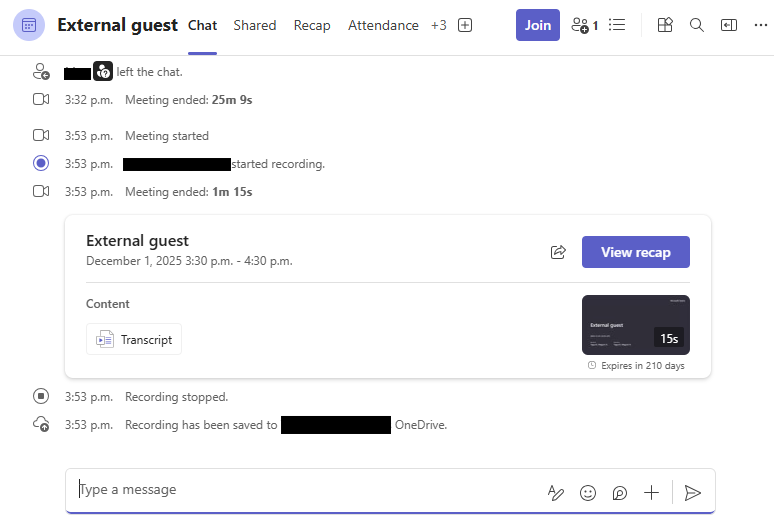
Can I record Teams meetings?
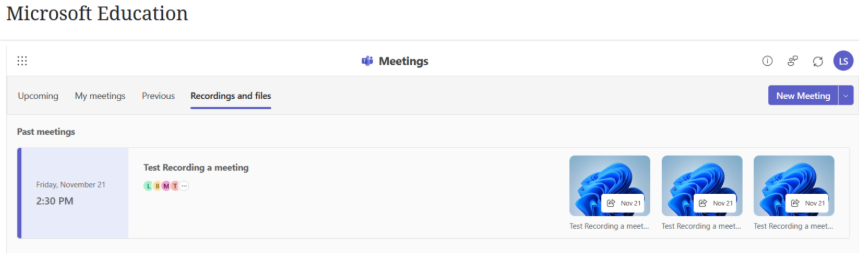
You can manually start and stop recording and transcribing meetings from the More actions button (…) in the meeting controls. Once the recording is finished, you can locate it in your OneDrive, in the Teams meeting channel, or in the Recordings and files tab in your Microsoft Education dashboard.

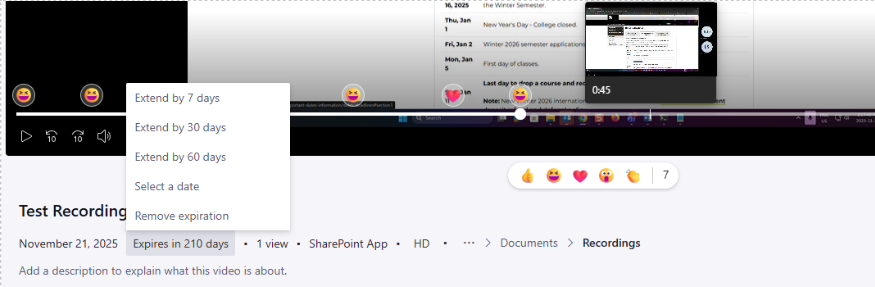
Recordings are stored in Stream for 210 days before they expire. However, you can extend or remove the expiration.
Meeting recordings do not capture whiteboards, annotations, or content shared by app. Please refer to the Microsoft help page on recording a meeting for more information.
More information: Record a meeting in Microsoft Teams
Can students see Teams meeting recordings?
-
OneDrive: Students can access the meeting recording in their OneDrive if they were invited to the Teams meeting.
-
Recordings and files tab:
-
Invited students: Students can access the meeting recording in Microsoft Education > Meetings > Recordings and files tab. Students that did not attend the meeting can still access the recording at a later time in the tab.
-
If Allow anyone to join was selected, students will not have access to the recording in the recordings tab even if they joined the meeting.
-
-
Teams meeting channel: Students who were invited to meetings or joined without being invited can view the recording in the Teams meeting chat.
How can I find attendance reports for meetings?
Basic attendance can be found in the Attendance tab the Microsoft Education dashboard. There is a detailed attendance report in the Teams meeting Attendance tab in the Teams app or browser.
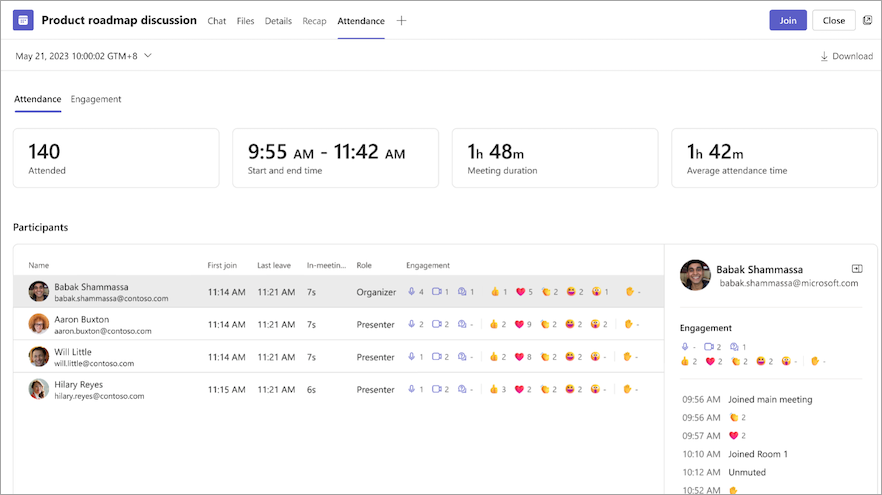
More information: Manage meeting attendance reports in Microsoft Teams
How can I invite students who enroll late to meetings and share recordings?
-
Students that are not yet enrolled in a course can still be invited to Teams meetings created within Blackboard. Start typing their name and their Microsoft account name will show up.
-
Students who enroll late can be added to recurring meetings that were created before they joined the class. Select Edit to the right of the meeting and add them to the list of participants.
-
Students cannot access recordings for meetings they were not invited to. To share a recording:
-
Navigate to Recordings and files.
-
On the right of the meeting title, there are two icons. Select the icon on the right with a share icon and the date of the meeting, which will open Sharepoint.
-

-
Click on Share on the top right and choose Copy link.
-
Email the student the SharePoint link. You will be notified by email when the student tries to access the recording as you will have to formally accept their request.
-
Even when the instructor has granted the student access to the recording, the recording will not appear in the student’s Recordings and files tab in the Microsoft Education dashboard.
Related resources: